


In today's article, I am going to share the steps for how to create the Flutter app with GetX architect. Let's start.
What is GetX?
GetX is a lightweight and powerful solution for Flutter. The solution combines high-speed state management with intelligent dependency injection, as well as route management.
Why choose GetX?
If Flutter is already a framework then why should you choose a micro-framework(GetX) for cross-app development in Flutter? So here are some benefits that GetX is providing.
Performance
GetX provides high performance and minimum consumption of resources. GetX does not use Streams or ChangeNotifier.
Decoupling
Business logic is separated from UI, and even dependencies can be separated using GetX Bindings.
Internationalization
GetX provides i18n out of the box allowing you to write applications with various language support.
State Management
GetX is its intuitive state management feature. State management in GetX can be achieved with little or no boilerplate.
Route Management
GetX provides API for navigating within the Flutter application. This API is simple and with less code needed.
Dependency Management
GetX provides a smart way to manage dependencies in your Flutter application like the view controllers. GetX will remove any controller not being used at the moment from memory automatically.
Validation
GetX provides validation methods for performing input validation in your Flutter applications, so no need to install any extra package for validation.
Storage
GetX provides a fast, extra light, and synchronous key-value in memory, which backs up data to disk at each operation. It is written entirely in Dart and easily integrates with the core GetX package.
Change Theme
While we are using GetX we don’t need to use any higher level widget than the “GetMaterialApp” widget and also we don’t need to use the “ThemeProvider” widget for changing themes.
STEP 1
Start a new Flutter project.
flutter create your_project_name
STEP 2
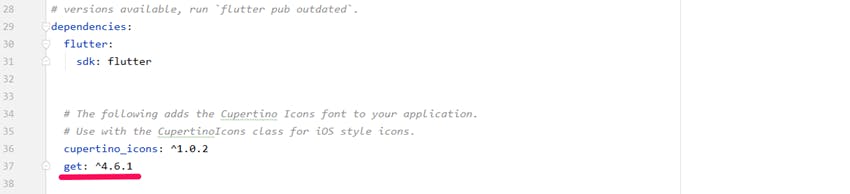
Add GetX package to pubspec.yaml
STEP 3
Make your app structure like the below image.
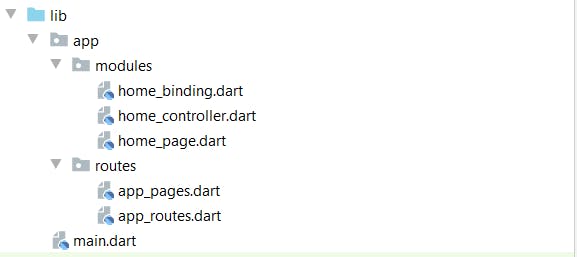
There will be three files per page. A controller, a binding, and a page/view.
Controller The GetxController class takes care of all your logic and makes your fields observable.
//home_controller.dart

import 'package:get/get.dart';
class HomeController extends GetxController {
}
Binding Bindings can be used to initialize your controllers, repositories, APIs, and whatever else you need without having to call them directly from the view page.
//home_binding.dart

import 'package:flutter_getx/app/modules/home_controller.dart';
import 'package:get/get.dart';

class HomeBinding extends Bindings {
  @override
  void dependencies() {
    Get.lazyPut(() => HomeController());
  }
}
Page/View You use this page to display your design in your app.
//home_page.dart

import 'package:flutter/material.dart';
import 'package:flutter_getx/app/modules/home_controller.dart';
import 'package:get/get.dart';

class HomePage extends StatelessWidget {
  @override
  Widget build(BuildContext context) {
    return GetBuilder<HomeController>(
      builder: (controller) => Scaffold(
        appBar: AppBar(
          title: const Text('Home'),
        ),
        body: const Center(
          child: Text('Hello World!'),
        ),
      ),
    );
  }
}
STEP 4
In GetX before navigating from one screen to another we require routes. So let's create routes.
//app_routes.dart

class AppRoutes {
  static const home = '/home';
}
//app_pages.dart

import 'package:flutter_getx/app/modules/home_binding.dart';
import 'package:flutter_getx/app/modules/home_page.dart';
import 'package:flutter_getx/app/routes/app_routes.dart';
import 'package:get/get.dart';

class AppPages {
  static final List<GetPage> pages = [
    GetPage(
      name: AppRoutes.home,
      page: () => HomePage(),
      binding: HomeBinding(),
    ),
  ];
}
STEP 5
Now change your MaterialApp widget with GetMaterialApp in main.dart and initialize your page.
//main.dart

import 'package:flutter/material.dart';
import 'package:flutter_getx/app/modules/home_binding.dart';
import 'package:flutter_getx/app/modules/home_page.dart';
import 'package:flutter_getx/app/routes/app_pages.dart';
import 'package:get/get.dart';

void main() {
  runApp(const MyApp());
}

class MyApp extends StatelessWidget {
  const MyApp({Key? key}) : super(key: key);

  // This widget is the root of your application.
  @override
  Widget build(BuildContext context) {
    return GetMaterialApp(
      debugShowCheckedModeBanner: false,
      title: 'Flutter Demo',
      theme: ThemeData(primarySwatch: Colors.blue),
      initialBinding: HomeBinding(),
      home: HomePage(),
      getPages: AppPages.pages,
    );
  }
}
All is done now run your app.
Conclusion
This is a simple step-by-step guide to show you how to create your app in Flutter GetX. For a better understanding, you can also check out the short movie app I made in GetX by clicking on the link below.
Link: github.com/socialmad/movie-app
I hope you like this article.